Technologies at Dutch Holographic Laboratory
Explore the technologies behind our holograms
Classical Techniques
Principals of Classical Holography: Reflection / Transmission
See More
Holography, photographing in 3 Dimension
About Holography and the principles of Holography, lots of books have been written. The basic principles of classical Holography will shortly be explained on this page.
What is a hologram...
A hologram is a sort of a photograph of a 3-Dimensional object. But where a photograph only records an object in 2 dimension, a hologram records also the third dimension of an object. And where a photograph can be viewed almost anywhere, a hologram can be viewed only when the hologram is lighted under the correct angle with either a laser lightsource (master-holograms) or a Halogen lightsource (reflection holograms). Take a look at the page "holograms" or in the Shop to see some examples. (Be ware: a computer screen is a two-dimensional display. Therefor you will not be able to see the third dimension of the holograms shown on this page.)
How a hologram is made...
The making of a hologram can be divided into 2 procedures. The making of a master hologram and the making of a reflection hologram. They both have to be recorded in total darkness. The recording of holograms is a process sensible to vibrations. Let's start with the recording of a master hologram. To record a master hologram, a few things are needed: an object, a holographic film, a beamsplitter and a laser. The lenses and mirrors needed to focus and lead the laserbeams will not be discussed here. The laserbeam is split into two beams using the beamsplitter. One beam is sent straight to the Holographic film, this beam is called the reference beam. The other beam, the object beam, is sent to the object, which is placed in front of the Holographic film. This will lead to 2 beams lighting the Holographic film from the same side. One beam straight from the laser source and the other reflected by the object. These 2 beams interfere with each other. Thus, an interference pattern is recorded on the Holographic film. After having developed the Holographic film, the obtained master hologram can be viewed by lighting the master hologram again with the reference beam under the same angle. The original object now can be seen through the master hologram.
The making of a reflection hologram does not differ very much from the making of a master hologram. The only substantial difference is where the light hits the Holographic film. The making of a master hologram required the lighting of the film from one side. The making of a reflection hologram requires the lighting of the Holographic film from both sides. So the reference beam will light the film from the front, and the object beam will light the film from the back side. Now a hologram is obtained that can be viewed best with a halogen lightsource or in sunlight. The hologram has to be lighted from above under an angle of 45 degrees. So, no laser needed here. Then why should you want to produce a master hologram, that can only be viewed under very difficult circumstances? The answer is rather shortly: because a master can be used, instead of an object, to record a reflection hologram. So once you have recorded a beauty of a master hologram, copies of it can easily be made. Besides, if you break a master hologram in two pieces, you get two identical smaller masters. Well, let us know if you manage to do that with a photograph.

The making of a reflection hologram
Embossed Holograms
See More
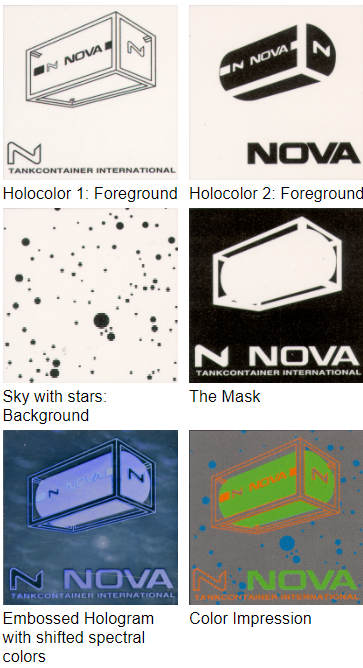
A 2D/3D embossed hologram consists of a fore- and a background. To parts of the foreground, different colors can be added. Please notice that the chosen colors can be seen only under one specific viewing angle. Changing the viewing angle leads to a shifting in the spectral colors, also named "holocolors". These colors arise from diffraction in the Hologram. Thus, each holocolor will go through all the spectral colors. Therefor we like to talk about holographic colors (holocolor). The standard holocolors are: red, green, yellow and blue. Mixcolors are also available, but only on experimental base.
DHL has special employees for graphical layout, who can translate your concept to an image, or use your rough drafts, scetches or photographs with high contrast. The image will be printed as a litho using a Macintosh computer, possibly after being adapted with Adobe Illustrator or Adobe Photoshop.

Modern Innovations
Multiple Photo Generated Holograms
See More

Recording set, where the camera in the foreground moves over the track while taking 150 shots off the scene
Up till now photographers are making the most beautiful two dimensional pictures and holographers make sparkling three dimensional pictures, called holograms. DHL offers photographers for the first time the possibility to make 3D holograms also, without the skills of a holographer. The innovative photographer now has the unique opportunity to make 3D pictures, holograms, in his own photo studio using the Holotrack™. To produce a MPGH Hologram, first one takes about 150 photograms of the scene, according to a special geometry.
To make the recording easy, DHL designed a setup controlled by a computer, for full automatic recording. DHL uses the straight track recording configuration. This is the most flexible method to make a MPGH hologram. To record all the views, the camera moves over a track and takes a picture every 3 cm (or any other interval). This results in a film roll of color slides with all the information needed to make a 3D hologram. After developing the film, it's placed in the optional Holoprinter™, wich converts it into a master hologram. Using this master hologram, extra hologram copies can be produced.

Control desk, including computer with the Holotrack™ software.
Computer Graphics 3D Modeling
See More
3D Modeling: it's amazing!
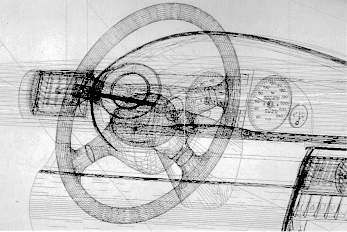
At Dutch Holographic Laboratory we use Silicon Graphics machines running Blender and our own holo software TRACES, and also AUTOCAD on pc's. As important medium we like to use 150 MB TAR tapes and, for smaller files, ordinarry 1.44 MB 3,5" floppies. Until now there is not a standard file format for exchanging 3D Data with all its features such as lighting and camera positions. We normally use DXF files of the Raw data and do the lighting and final view positions ourselves. The Raw DXF file, wich is build up by polilines, is easy to translate. The lighting determines for a great deal the quality of the hologram. The contrast and dynamic range of a hologram differ from photographs. To get a high quality hologram, this needs extra attention.
For the positioning of the 3D model in the hologram, we use our almost 20 years of experience in holography. We alter a picture of the main view of the object a little bit to get more depth, parallax and dimensionallity. The size of the 3D model has to fit in the holographic space of a 30 x 40 cm hologram. This means the "length:width:depth" ratio should be "3:4:4". When imagewraps are used, please include them on the TAR tape in a SGI, TARGA or TIFF format. Also include a picture that shows which parts have the imagewrap. Let us know if we have to render with or without shadows and if there are parts that mirror. Holograms can be made in different monochrome colors: red, yellow, orange and green.
